Remote access to your router is a powerful feature that offers flexibility and control over your home network, even when you’re miles away. Whether you need to assist family members with internet troubleshooting, monitor network activity, or access files stored on an external device connected to your router, enabling remote access can streamline your efforts. This guide provides a step-by-step walkthrough to help you securely configure remote access to your router.
Why Enable Remote Router Access?
Remote router access serves several practical purposes. Here are some of the key benefits:
1. Troubleshooting and Support
If you frequently assist family members with internet issues, remote access eliminates the need to be physically present. You can diagnose and resolve problems from anywhere.
2. Network Monitoring
Keep track of your network usage in real-time. For instance, you can check if your children are online when they should be focused on homework or other tasks.
3. Security Management
Monitor for unauthorized devices and disconnect them instantly. This proactive approach can prevent potential intrusions.
4. File Access
If you have external storage connected to your router, remote access enables you to retrieve files anytime without additional software or devices.
Unlike remote desktop tools like TeamViewer, remote router access doesn’t rely on powered-on computers, making it an efficient solution for long-term management.
How to Set Up Remote Access to Your Router
Setting up remote access requires activating specific features on your router and ensuring a secure configuration. Follow these steps:
Step 1: Enable Remote Management
The first step is to activate the Remote Management (or Remote Access) feature in your router’s settings:
Access the Router’s Web Interface
- Open a web browser and type your router’s local IP address (commonly
192.168.1.1or192.168.0.1). - Log in using your router’s admin username and password.
Locate Remote Management Settings
Different brands place this setting in various sections. Here’s where to find it for some popular routers:
- Netgear: Navigate to Settings > Remote Management.
- D-Link: Go to Tools > Administration > Enable Remote Management.
- Linksys: Look under Administration > Remote Management.
- TP-Link: Find it under Security > Remote Management.
- ASUS: Go to Administration > System > Remote Access Config.
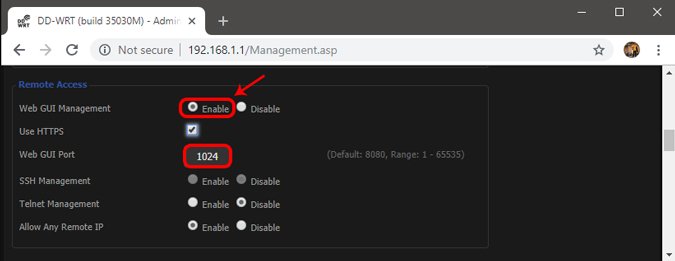
Change the Default Port Number
For added security:
- Avoid using default ports like
8080, which are widely known. - Choose a unique port number (e.g.,
9090).
Strengthen Password Security
Use a strong, unique password for your router’s admin account to prevent unauthorized access.
Step 2: Configure Dynamic DNS (DDNS)
Since most home internet connections use dynamic IPs that change periodically, DDNS ensures you always have a consistent address to access your router.
What Is DDNS?
Dynamic DNS assigns a memorable domain name to your network’s IP address. This domain automatically updates when your IP changes.
How to Set Up DDNS
- Access DDNS Settings
Log in to your router’s web interface and navigate to the DDNS settings. This is typically found under Administration or WAN Settings.

- Choose a DDNS Provider
Most routers support popular providers like No-IP or Dyn DNS. No-IP offers a free and easy-to-use service.
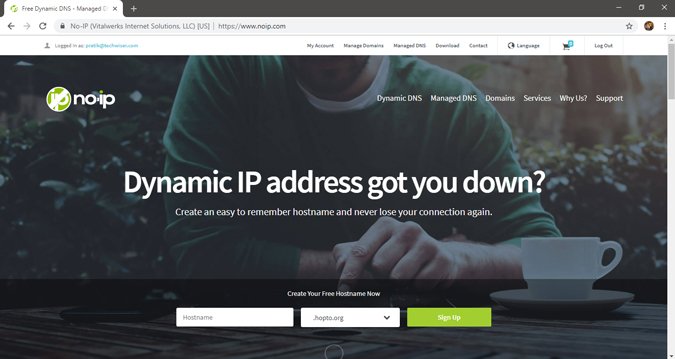
- Create a DDNS Account
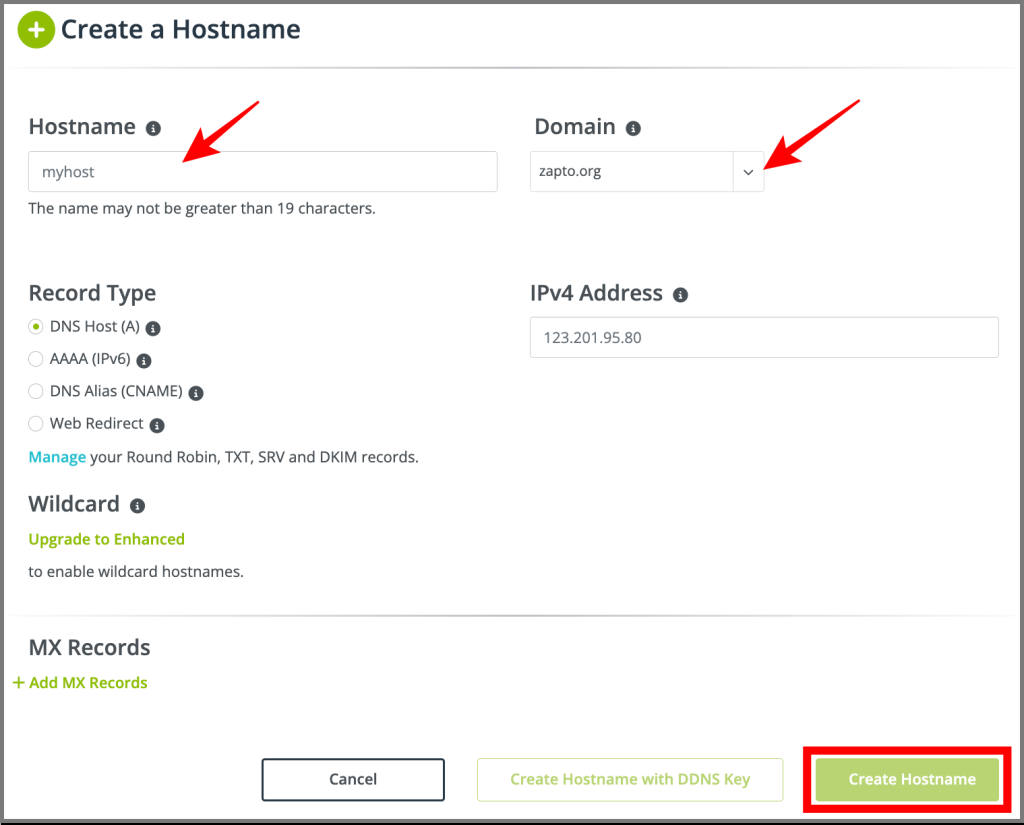
- Go to Dynamic DNS > No-IP Hostnames and click Create Hostname.
- Enter a hostname (e.g.,
myhome.ddns.net) and save it.
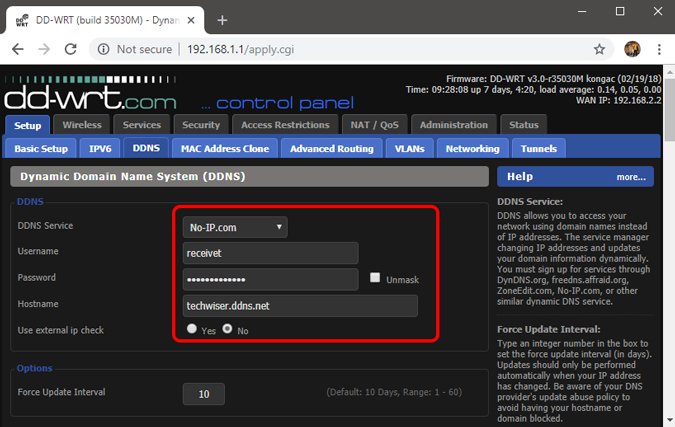
- Link DDNS to Your Router
- In your router’s DDNS settings, enter the hostname you created.
- Authenticate with your No-IP username and password.
- Save the changes.
Access Your Router Remotely
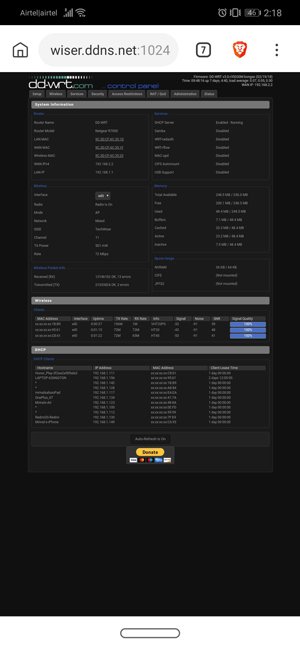
Use the DDNS hostname with your chosen port number to access your router (e.g., myhome.ddns.net:9090).
Security Best Practices
1. Use Strong Passwords
Both your router and DDNS account should have complex passwords combining uppercase and lowercase letters, numbers, and symbols.
2. Change Default Ports
Default ports are common targets for hackers. Changing the port to a less obvious number enhances security.
3. Enable HTTPS
If supported, enable HTTPS for remote management to ensure encrypted communication.
4. Regularly Monitor Connected Devices
Periodically check your router’s web interface for connected devices to ensure no unauthorized users are present.
5. Disable Remote Access When Not Needed
For added safety, toggle the remote access feature off when not in use.
Conclusion
Setting up remote access to your router empowers you with seamless control over your home network from anywhere. By enabling remote management and configuring DDNS, you can monitor and manage your network securely and efficiently. Following security best practices ensures your setup remains robust against potential threats, giving you peace of mind and added convenience.
Frequently Asked Questions (FAQs)
1. Is enabling remote access safe for home routers?
Yes, as long as you follow best practices such as using strong passwords, changing the default port number, and enabling HTTPS (if available).
2. Can I access my router remotely without DDNS?
Technically, yes, by using your public IP address. However, since public IPs change regularly, DDNS offers a more user-friendly and reliable option.
3. What if my router doesn’t support DDNS?
You can use a DDNS client on a computer to update your IP periodically, though this requires the computer to stay powered on.
4. Can I disable remote access when I don’t need it?
Absolutely. Most routers allow you to toggle remote access on or off as needed, enhancing security.
5. Why does my public IP address change?
Most ISPs assign dynamic IP addresses to conserve resources. Residential users typically have dynamic IPs, whereas businesses may have static IPs.
By following these steps, you’ll be well-equipped to manage your network remotely, securely, and with minimal hassle.
