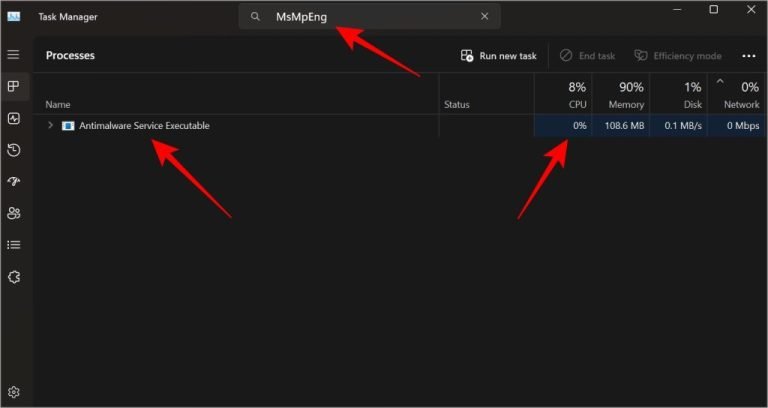
The Antimalware Service Executable is a vital part of Windows Security, tasked with protecting your PC from malware and other threats. This process, also known as MsMpEng.exe, operates as part of Windows Defender and ensures your computer remains secure. However, it is not uncommon for users to experience high CPU or RAM usage due to this process, leading to noticeable slowdowns.
In this comprehensive guide, we’ll explore the causes of this issue and present actionable solutions to help you optimize system performance without compromising security.
Why Antimalware Service Executable Uses High CPU
High resource usage by the Antimalware Service Executable often occurs during malware scans, especially if you’re running applications simultaneously. While this process is necessary, its resource consumption can sometimes interfere with regular usage. Fortunately, there are ways to mitigate the impact while maintaining system protection.
Should You Disable Antimalware Service Executable?

Disabling the Antimalware Service Executable is not recommended. This process is integral to Windows Defender, which is essential for protecting your system from malware, spyware, and other threats.
Even if you manage to temporarily disable it, Windows Defender will restart the service to ensure your PC remains secure. Instead of disabling it, consider the following troubleshooting steps to address performance issues.
Effective Solutions to Fix High CPU Usage
1. Run a Manual Scan to Eliminate Threats
Running a manual malware scan is a simple yet effective first step. It ensures any lurking threats are identified and removed.
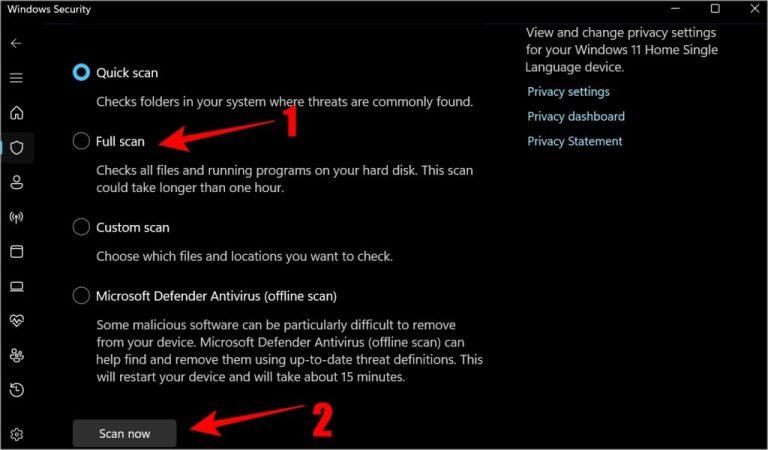
Steps to Run a Manual Scan:
- Open Windows Security via the Start menu.
- Navigate to Virus & threat protection.
- Click on Scan options under the Quick Scan section.
- Select Full scan and click Scan now.
For enhanced security, consider using Malwarebytes alongside Windows Defender. It can:
- Detect threats missed by Defender.
- Reduce system resource consumption with optimized scans.
Pro Tip: Avoid running two antivirus programs simultaneously to prevent system conflicts. Malwarebytes automatically disables Defender when installed as the primary antivirus.
2. Turn Real-Time Protection Off and On
Sometimes, toggling the Real-Time Protection feature can resolve temporary glitches causing high CPU usage.
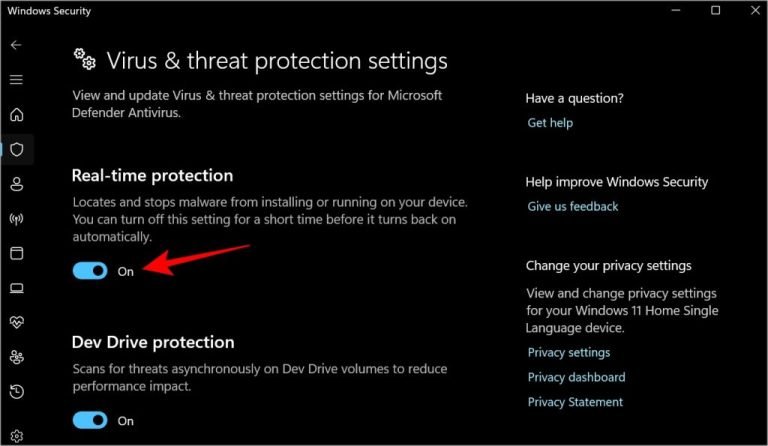
Steps to Toggle Real-Time Protection:
- Open Windows Security and navigate to Virus & threat protection.
- Select Manage settings under Virus & threat protection settings.
- Toggle Real-time protection off, wait for a few moments, and turn it back on.
If the issue persists, proceed to the next solutions.
3. Adjust Windows Defender’s Scan Schedule
Background scans initiated by Windows Defender can coincide with peak usage times, causing performance dips. Changing the scan schedule can alleviate this issue.
Steps to Modify the Scan Schedule:
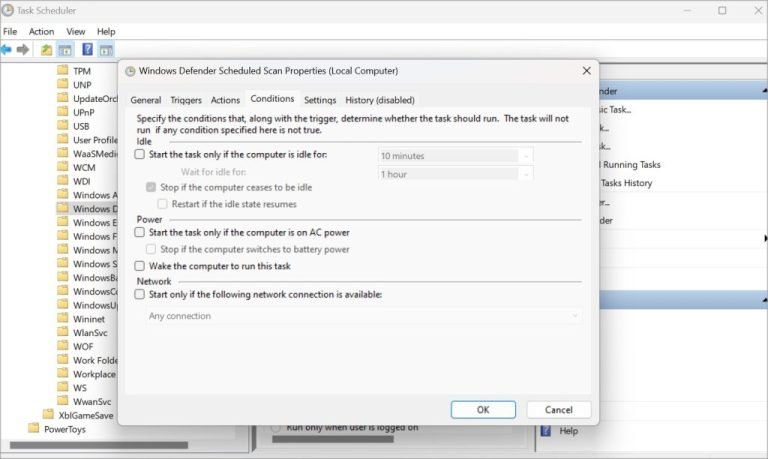
- Open Task Scheduler via the Start menu.
- Navigate to Task Scheduler Library > Microsoft > Windows > Windows Defender.
- Right-click Windows Defender Scheduled Scan and select Properties.
- Uncheck Run with highest privileges and adjust the scan frequency to weekly or a time of your choice.
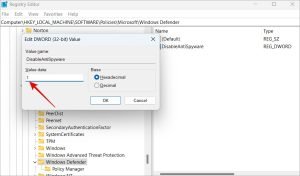
4. Disable AntiSpyware Using Registry Editor
If you suspect high resource usage stems from registry conflicts, you can disable the AntiSpyware feature.

Steps to Disable AntiSpyware:
- Open Registry Editor with administrative privileges.
- Go to:
HKEY_LOCAL_MACHINE\SOFTWARE\Policies\Microsoft\Windows Defender. - Right-click the right pane and select New > DWORD (32-bit) Value.
- Name the file DisableAntiSpyware and set its value to 1.
- Save the changes and restart your computer.
5. Disable Exploit Protection Service

Windows Defender’s Exploit Protection feature may cause resource loops if it fails to terminate certain processes. Disabling this service can reduce CPU usage.
Steps to Disable Exploit Protection:
- Open PowerShell with administrative privileges.
- Paste and execute the following command:powershellCopy code
ForEach($v in (Get-Command -Name "Set-ProcessMitigation").Parameters["Disable"].Attributes.ValidValues) { Set-ProcessMitigation -System -Disable $v.ToString().Replace(" ", "").Replace("`n", "") -ErrorAction SilentlyContinue }
This command stops the Exploit Protection service without impacting security.
6. Perform a Clean Boot
Performing a clean boot eliminates interference from third-party applications and services that might be contributing to the problem.
Steps for a Clean Boot:
- Press Win + R, type
msconfig, and hit Enter. - Go to the Services tab, check Hide all Microsoft services, and click Disable all.
- Restart your computer.
If the issue resolves, gradually enable services to identify the culprit.
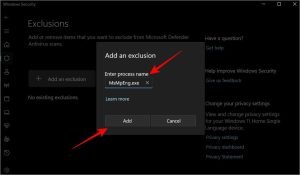
7. Add MsMpEng.exe to Exclusions
Sometimes, the Antimalware Service Executable scans itself, creating a loop that increases CPU usage. Adding it to the exclusion list can resolve this issue.
Steps to Add MsMpEng.exe to Exclusions:
- Open Windows Security.
- Navigate to Virus & threat protection > Manage settings.
- Scroll to Exclusions and select Add or remove exclusions.
- Click Add an exclusion, choose Process, and enter MsMpEng.exe.
Conclusion
The Antimalware Service Executable is a cornerstone of Windows Security, ensuring your system remains protected. While its high resource usage can be frustrating, disabling it entirely is not advisable. Instead, follow the steps outlined above—such as manual scans, toggling real-time protection, or adjusting schedules—to address performance issues without compromising security.
By applying these fixes, you can enjoy a smoother PC experience while keeping your system safeguarded.
Frequently Asked Questions
1. Can I disable Antimalware Service Executable completely?
No, it’s not recommended to disable it, as it plays a crucial role in safeguarding your PC. Disabling it exposes your system to malware and other threats.
2. Does installing another antivirus stop Antimalware Service Executable from running?
Not entirely. Windows Defender, including the Antimalware Service Executable, may continue running in the background unless the new antivirus disables it automatically.
3. Why is Antimalware Service Executable using so much CPU?
This typically occurs when Windows Defender runs scans. Scheduling scans for non-active hours or adding exclusions can reduce CPU usage.
4. How can I stop Antimalware Service Executable from scanning itself?
You can add the MsMpEng.exe process to the exclusion list in Defender’s settings to prevent it from scanning itself.
5. Is Malwarebytes a good alternative to Windows Defender?
Yes, Malwarebytes is a trusted antivirus tool. However, running both simultaneously can cause conflicts. If you choose Malwarebytes, let it manage system protection to avoid resource issues.

